Kitchen Progress - Phase Two Complete!

posted on: Monday, November 28, 2016

I could not be happier to be updating you all today on the progress of our kitchen! We finally replaced our sad linoleum floor with beautiful adoni slate and cement tile. I selected and secured the materials and did the design layout for the tile myself, but we hired out the actual labor. It went as smoothly as not having access to your kitchen for two weeks can go ;)  but we finished on time and budget and you can't ask for much more than that.  I love the finished results! 

Here's a quick peek at our kitchen floor "before" (This picture is post phase one where we had completed a lot of cosmetic changes to the room but no major construction).


...and now after!


And yes, we also added a little butcher block top island and stools. I am loving this room more and more. And I'm so happy that all we have left for the final phase will be to install new countertops. We're almost there! 


Our Home Office Before + After

posted on: Monday, July 4, 2016


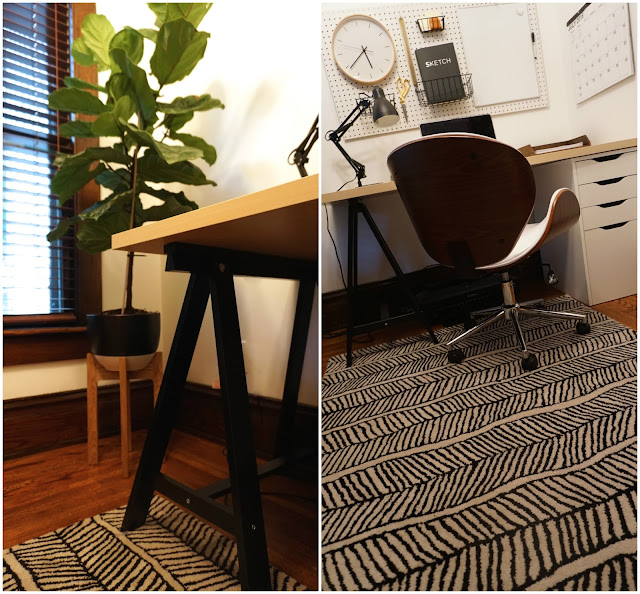
What you probably didn't know was that tucked away in a corner of our house right off the dining room is a little home office. You probably didn't know this because never showing it to you in any photos of my house up until now was a premeditated, tactical decision. Because this room, my friends, was bad. BAD. It had bright orange walls for starters, and a giant hole in the ceiling from a water leak. The walls in the area around the leak were also badly damaged and hung in the center of the room was a very outdated and not at all my style light fixture. This room was very, very bad indeed. But also, who really cares? Because we weren't using it much, other than to store copious amounts of junk and it was easy to ignore when there were so many other rooms that needed our attention. But now that we're three years into living in this house, and all the major rooms have gotten a face lift for the most part we thought; huh, maybe it's time we patch up that gaping hole in the office ceiling and paint over all that orange. 

And now comes the time to air my dirty laundry... aka "Before" pictures...


oof. and now...

After


better, right?


Source List: Desk pieces parts from IKEA, Desk Chair, Light Fixture, Rug, Plant Stand, Green Velvet Pillow, Black Buffalo Check Pillow


The Master Bedroom!

posted on: Monday, January 18, 2016


Who here is ready for some good old fashioned before and after porn? These are my favorite type of posts to read on other blogs and of course it's even better to write one of these posts myself when it's my own home that's gotten a facelift in some way. Today I've got before and after photos of my bedroom. It has been long neglected since it's so easy to put off redoing a space that no one ever really sees except us.  But after over two years of living in a room with no rug, no window treatments, no new paint (except the one door we did when we painted the hallway) it was way past time. Again, this isn't a public space and there are other areas of the house I'd much rather spend money on (hello, kitchen floor!) so I didn't want to buy all new everything in here. If you remember from the mood board I did way back when, we planned on keeping our existing bed, dresser and nightstands and only purchase new for the things we were missing. Below are a few photos I snapped before we started the renovations. Quality is poor and I somehow managed to forget to get an image of the broken ceiling fan/light fixture we inherited with no cover and awesome exposed bulbs. You'll just have use your imagination ;) 


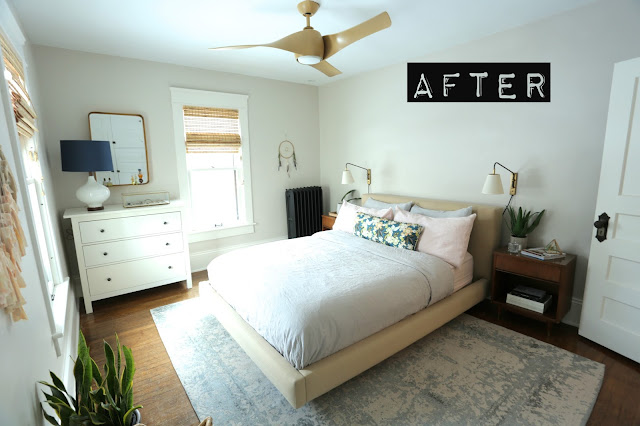
...and now!


Hooray! I no longer have to hide this room behind closed doors like the ugly stepchild that it once was! The blue stripe is gone! So! Many! Exclamation! Points!!!! 

Ha, but seriously it's amazing what a little paint and lots of new lighting can do for a space. I also added a rug, new bedding and some accessories and we were in business. I have no idea what took us so long but thank god it's finally under control in here. I can sleep so much easier now ;)

Source list:

Wall color is Skimming Stone from Farrow & Ball, Bedding, floral pillow is custom made with fabric I ordered here, sconces, ceiling fan/light, area rug, mirror, lamp on dresser


Master Bedroom Mood Board

posted on: Thursday, July 30, 2015


Here's the deal, we've lived in our house for over two years now (wut?) and I am going to lose my damn mind if we don't get a handle on our master bedroom situation soon. We have not done one thing in there since the day we moved in besides throwing in our existing furniture and putting our clothes in the closets. Like, not one single thing. We still have a blue stripe of paint running the circumference of the room better suited to the 12 year old boy who previously inhabited the room than the two grown ass adults who are too lazy to drag out the paintbrushes. We don't even have a switch plate cover over the light switch. Apparently in an entire two years we just could not be bothered. Speaking of which, we have a ceiling fan in there that's missing the cover over the lights and so we have two exposed bulbs sticking out. You guys. You guyyyyyyzzzzzzz. This can not continue. (If it sounds like I'm being overly dramatic, that's because I am). 

So here is what I'm doing. I finally started designing the space. Putting a plan into place so we at least have a direction to go in with this room. Maybe spark a little motivation to actually start in here? That is my hope. The problem is that there are a lot of rooms in the house where we could be spending our dollars and only so many dollars to go around. I want a new kitchen floor (badly), new counter tops, new tile in the boy's bathroom...the list goes on and on. So it's been easy to put off our bedroom because no one ever sees it but us. Well, I think it's time to direct a little attention in here at last. Now, I'm not going crazy at all in here. (I still REALLY want a new kitchen floor.) I'm keeping all of our current bedroom furniture (bed, dresser, nightstands) and just adding in the pieces we still need (rug, mirror, lighting). Plus a little paint, a new fan and all new bedding and we'll be in business.

I'm making it sound so easy, right? ha. Anyway, here's what I'm thinking.


That floral fabric was my inspiration for the colors in the room. I'm going to have a big custom bolster pillow made out of it to be the centerpiece on our bed. The rug, I love. But it's expensive. All big rugs are stupidly expensive but you still need them. Still looking for a more affordable option but so far I've been coming up short. The fan was a compromise because Josh insists we have a ceiling fan while I would have preferred a cool new light fixture, but I'm okay with this one. I like it enough and it pairs well with the sconces. The paint color might be a bit tricky. This one is Skimming Stone by Farrow & Ball, but I may need to get a few different paint samples up on the walls before making my final decision. Either way, I still feel like I've made some progress over here. Mind you, this is all hypothetical and not one thing has actually been done yet, but still...progress!

Now, anyone wanna come sand some trim with me? ;)


Powder Room Update!

posted on: Wednesday, May 13, 2015


I've got one more house update up my sleeve to share with you today. We finally got around to updating our first floor powder room. Watching this little room's transformation was wildly satisfying. One, because it's the first room in the house I've used wall covering in (hopefully not the last!) and two, because we actually hired someone to do the work this time. I have no paper hanging experience and I really didn't want to take my fist stab at it in here with all the eaves to consider and risk ruining all that beautiful wall covering by royally screwing up the install trying to do it myself. So, we hired a paper hanger and since he was already coming in anyway, we had him go ahead and paint the trim too. I can not tell you how amazing it felt to leave in the morning and come home to fresh paint in a room that I did not have to do myself. Such a luxury. It probably won't be happening again anytime soon, but man, I could get used to that.

So, I did intentionally take before photos of this room but I have scoured every file and hard drive I have and for the life of me I CAN NOT FIND THEM. Grrrrrrr. Anyway, if you want a visual for the "before" the walls above the wainscoting were a dark chocolate brown and the trim and wainscoting was all a light tan color. The sconces that were in here were two ancient pull chain sconces and one was completely broken so we only had one working light.  It was pretty stellar, obviously. 

So we updated it with new wall covering, dark trim, new sconces, a new rug and a few accessories. But here's my confession. I don't love the new sconces. It has been such a struggle to find replacements because they have to be pull chain, which (surprise!) hardly anyone makes anymore and good luck finding any that are stylish to boot. Old houses do have their down sides. I discussed rewiring the sconces to be switch operated with Josh's dad who is really adept at electrical work and the process was not going to be pretty. Because of our particular electrical situation we'd have to slice all the way through the walls to pull the wiring to a switch at the entrance of the room and then we'd have to re-drywall etc. Ideally, this is what we'd do, but for practical purposes it just seemed like way too much work for a switch. In the end we decided to stick with pull chain sconces to avoid the hassle, but I'm still wondering if we made the right decision. And I'm still on the lookout for better sconces. But for now, these were the best I could find, and hey at least they both work. Baby steps!

Josh and I also discussed switching over the faucet, towel bar and hardware to pieces with a brass finish, but of course the faucet I've fallen in love with is on the spendy side of things (always), so that may come as a phase two situation down the road. We also still need some artwork, so we're not totally done in here by any means BUT at least we have progress! I'll be sure to update with new pics if (when, let's be real) that happens ;)

For now though, here she is 


Source List: Paint color Benjamin Moore 2124-10 Wrought Iron. Wall Covering. Sconces. Rug. Hand Towels. 

p.s. special thanks to victor for taking pictures of this crazy, cramped little space for me!


Ever's Room, Before + After

posted on: Sunday, February 1, 2015

Today I wanted to share photos of baby girl's finished bedroom if you'd care to take a peek. I feel like it's been so long since we've done any real improvements on the house considering that for about the last year or so I've been either sick and tired, heavily pregnant or taking care of a newborn. So getting her room finally finished has been a really big goal of mine. You may remember the "before" post I did awhile back and I ended up sticking pretty closely to the furniture plan and mood board I put together at the time. I ended up changing out the light I'd had in mind for something bigger and switched out the side table for something cuter, but otherwise I pretty much stuck to the plan. Here are a few photos to jog your memory in case you don't remember what it looked like before.


And here it is now!


If you remember when we started overhauling this space we had no idea if our little one was going to be a boy or a girl. So, outside of the basic gender neutral furniture pieces I'd selected, this room was sitting pretty empty up until just a couple of months ago. Once she arrived and we knew our baby girl was, in fact, a girl, I started gathering accessories to start layering in. I don't feel like I went overly girly in here, but after two boys I have to admit it was fun to play around with a few accessories that were more on the feminine side of things for a change. Most importantly though it just feels like a bright, happy and energetic space when you walk through the door instead of the depressing, dark box it was before. Architecturally speaking Ever's room is definitely the most boring room in our house (sorry baby!) with just four square walls and a single window. So, it was a bit of a challenge to spice it up without any of the fun architectural details found elsewhere in our house that I normally have in my corner helping bolster the design. (Like Oren's amazing wall of windows or Wes's fun room shape and built-ins.) But baby girl does have her own attached full bath, so don't go feeling too sorry for her yet ;)

Anyway, I'm pretty happy with the final product. I'm dreaming of someday switching out the tasseltry hanging over the crib for a huge, colorful wall weaving ala Maryanne Moodie, but I haven't found just the right thing quite yet (I also don't have those Maryanne Moodie dollas quite yet either if you know what I'm saying ;) but when I do, you'll be the first to know.


Source list: crib, bookshelf, rocker, side tables, pouf, pillow on rocker, throw on rocker, doll on rocker, table lamp, bunny bust on wall, hexagon shelves on wall, elephant basket, quilt on crib, ombre pillow in crib,  bear pillow in crib, bunny doll in crib, rectangular area rug, round rug, tasseltry above crib, mobile, baskets on top of bookshelf, triangle garland, sheep pillow, wolf print, giraffe print, print on wall, window shade, bamboo chandelier. The dresser and mirror were thrifted and came as a set. Instead of buying a new mirror I saved a few bucks by using the existing and just painting it gold. The sheep blanket was handmade for Ever by her great grandmother, but you can find the pattern here. The globe is vintage and everything else were just books and things I already had lying around or bought on sale at Target or West Elm. Paint color is Benjamin Moore, OC-17, white dove.

We also made over Ever's little attached bath as well. The tile and fixtures aren't my favorite but they're also not bad so we just gave the room a little cosmetic touching up for now. We painted out the walls, trim and ceiling and got some new hand towels and a new bath mat. We replaced the outlets and covers, robe hooks and toilet paper holder. We also finally got a pair of updated sconces in here which are super fun for a kid's bathroom. The before pictures are pretty terrible, but here's what I've got.


 and...


Source List: sconces are from Onefortythree (gloss white finish with teak veneer options), wall paint color is Teresa's Green by Farrow & Ball, trim and ceiling color is Benjamin Moore, OC-17, white dove.

***Post Edit: See Ever's room over on Apartment Therapy as well!***


I Am Emme All rights reserved © Blog Milk Powered by Blogger